There are many ways to record an acoustic guitar to get a wide range of different sounds, but no matter which techniques you use — and how many mics are involved — here are some things to keep in mind:
1. Do not place the microphone directly in front of the sound hole.
This may seem like the most intuitive place to put a mic for an acoustic guitar, but the sound hole is like a fire hose for sound waves. Any mic placed directly in front will have all detail washed out by the gushing bass frequencies that come blasting out through the sound hole.

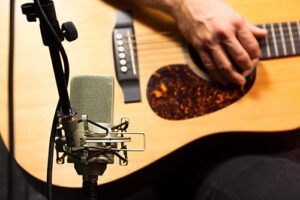
2. For a balanced sound that captures high end, place the mic about 12 to 16 inches away from the 12th fret.

The “money spot” for acoustic guitar recording. This area just off the sound hole going towards the neck provides the microphone with a balanced tone that’s not washed out by bass and enables it to pick out more fretted string detail. This position is the most reliable way to capture a pleasing sound that’s true to the tone of the instrument.
[pictured] The MXL CR89 is a great large diaphragm condenser microphone for recording acoustic stringed instruments like guitar.
3. For a balanced sound that adds a little more bass, try positioning the mic a little above the sound hole or behind and below the bridge.

If you want to add a little more power to your sound without washing it out with bass, move it back down the guitar. By placing the mic above the sound hole about 12 to 16 inches away, the sound will feel slightly fuller.
Positioning the mic behind and below the bridge, angled toward the player’s hand, will produce a similar effect. This position picks up slightly less bass, and not as much fretted string detail, but has a nice clear mid range. This bridge position will also capture more of the pick sounds when strumming.
[pictured] The MXL 990 condenser microphone is a high-quality and economical all-around mic for vocals and instruments.
4. Experiment with different-sized condenser mics, and even some dynamic mics as well.
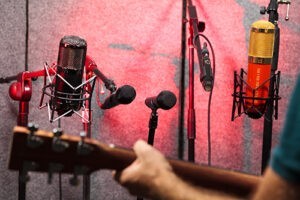
Generally speaking, most sound engineers use condenser mics for acoustic guitar because of their higher sensitivity, but for certain types of guitars, dynamic mics may fit better. It really all depends on the type of sound you’re looking for. For condenser mics, small diaphragm and large diaphragm mics will produce different sounding textures, with large diaphragms tending to be a little more expressive, and small diaphragms a little truer to the sound of the guitar. Try out as many different kinds of mics as you can in multiple locations to get the sound you’re after.
[pictured] MXL manufactures a range of large and small diaphragm condenser mics as well as live dynamic mics to capture an ideal sound for any acoustic guitar setting. From left to right, the MXL CR89, LSM-5GR, LSM-3, CR21, and MXL Genesis Tube Mic.
5. Try the XY technique for a stereo sound and give more options to your mix (just watch out for phasing issues).
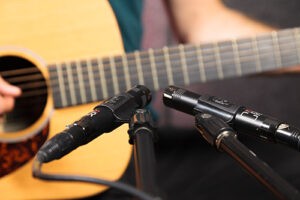
Bringing another mic into the session can double the fun, but you have to be careful to line them both up correctly. The classic XY position gives you two signals to blend and EQ in the mix. You can place the mics close together, or spaced apart, and you can experiment with different locations. Typically engineers will use the spaced out formation, with one mic near the “money spot” by the 12th fret, and the other by the bridge.

It is also common to place the mics very close to each other, even on top of each other, to get a stereo recording from a select location.

But the main thing to remember is to position each mic at the exact same distance away from the guitar. Otherwise, the sound waves hit each mic at slightly different times and produce phase complications that can muddle the sound. If this happens, you can flip the phase on your interface channel or on your recording software track by pressing the button that looks like “Ø”
[pictured] The MXL CR21s and 603s are two small diaphragm instrument mics that work great for the XY recording technique.
6. Don’t be afraid to try a little mid-side action.
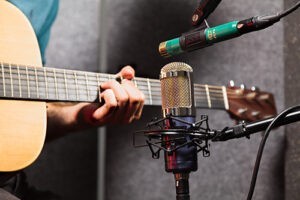
If you’ve got a handle on the XY technique and your favorite mic positions dialed in, the mid-side recording technique can be a fun challenge to take your recording capabilities to the next level. The mid-side technique requires a single cardioid mic placed directly on top of a figure-8 mic, with the cardioid pointed at the instrument and the side-address figure-8 perpendicular to the cardioid.
Once in the DAW, the figure-8 track is duplicated and the engineer pans and EQs each track to create a “widening” effect of the guitar between the speakers. The mid-side technique can really add definition and detail to your acoustic guitar recording, and it gives you a lot of options when mixing the instrument into a multitrack song. *One vital step to remember is to flip the phase signal on the duplicated figure-8 track in your DAW.
[pictured] The MXL R144 Ribbon Mic is an excellent figure-8 mic for the mid-side recording technique, as is the the MXL V67N working as the cardioid mic on top.
7. If phase issues become insurmountable, try the single mic stereo trick in your DAW.
Simply record the guitar using your favorite mic in your favorite position, and then make two copies of the track in your DAW. Pan one to the right and put a high pass filter on the EQ to make this the “fretted string” sound, then take the other track and pan it to the left and put a lowpass filter on it to make it the “guitar body” sound. Keep the original track in the center, mix to your liking, and voila — you have a simulated stereo acoustic guitar sound.
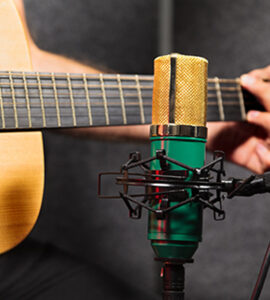
[pictured] The MXL V67G is a condenser microphone designed primarily for vocals, but it can also add warmth and richness to an acoustic guitar recording.
MXL Microphones manufactures a number of different mics that can work great for acoustic guitar applications. The CR89 is one of the most popular for acoustic guitar, as is the V67N small diaphragm condenser, and CR21 pair.

